1. Flip texture
1. Creating your own effects - Windows - Direct3D9 - Flip texture
Last edited 2026-03-29
To start creating effects in Clickteam Fusion, you need to begin with the "absolute basics"
In this example, you'll learn how to create an effect that flips a texture for Direct3D 9.
We'll need two files:
- An XML file that contains information about the effect, such as who created it, which variables can be modified, and so on.
- An FX file containing the source code for the effect for Direct3D 9.
1. Go to the folder where Clickteam Fusion 2.5 is installed, and within that folder, go to "/Effects"
2. Create two new empty files; they must have the same name but different file extensions (.xml and .fx)
For example: MyFirstShader.xml and MyFirstShader.fx
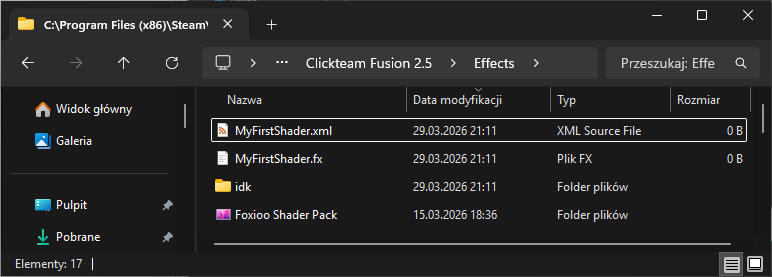
3. After refreshing, check the list of effects to see if "MyFirstShader.fx" appears.

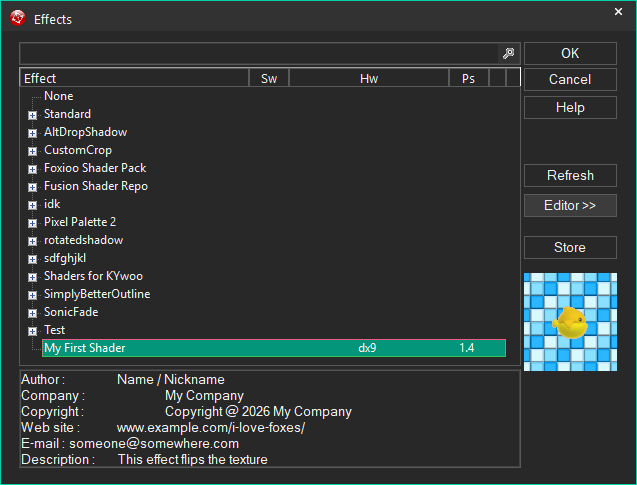
4. Open "MyFirstShader.xml" in a text editor and paste the text below, which contains basic information about the effect; edit the elements to include your own information.
You can find an explanation of what these tags do here.
<effect>
<name>My First Shader</name>
<description>This effect flips the texture</description>
<author>Name / Nickname</author>
<company>My Company</company>
<copyright>Copyright @ 2026 My Company</copyright>
<website>www.example.com/i-love-foxes/</website>
<email>someone@somewhere.com</email>
</effect>
5. Refresh the list of shaders and the information should appear.

6. Now it’s time to modify the shader itself.
First, you need to figure out what you’ll need. If you want to flip the texture, you’ll need a sample of it.
At the beginning of the "MyFirstShader.fx" file, add the following line:
sampler2D img : register(s0);
(This is a global variable that retrieves a texture from the s0 register)
7. Add the following very simple function.
It retrieves the colors from each pixel and displays them.
float4 ps_main(in float2 In : TEXCOORD0) : COLOR0
{
/* Get Texture */
float4 render = tex2D(img, In);
/* Return */
return render;
}
8. Finally, you need to include information about the technique;
Direct3D 9 needs to know which version of the Pixel Shader you want to use, and what the main function is.
technique tech_main { pass P0 { PixelShader = compile ps_1_4 ps_main(); } }
9. The final code should look like this:
sampler2D img : register(s0);
float4 ps_main(in float2 In : TEXCOORD0) : COLOR0
{
/* Get Texture */
float4 render = tex2D(img, In);
/* Return */
return render;
}
technique tech_main { pass P0 { PixelShader = compile ps_1_4 ps_main(); } }
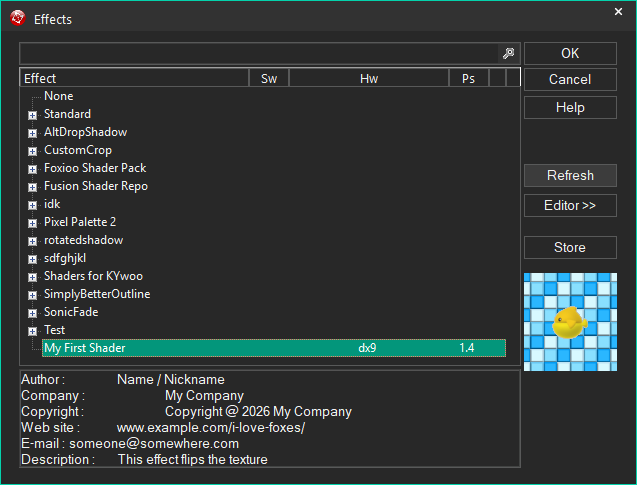
10. Refresh the list of results, and you'll see that the "Ps" column shows "1.4":
Time to flip the texture!
You need to modify the main function.
11. Modifying the shader.
We add a new variable called "texCoords"; it contains information about the pixel's position, but the X-axis values are flipped.
float4 ps_main(in float2 In : TEXCOORD0) : COLOR0
{
/* Flip */
float2 texCoords;
texCoords.x = 1.0 - In.x;
texCoords.y = In.y;
/* Get Texture */
float4 render = tex2D(img, texCoords);
/* Return */
return render;
}
To flip the image, we need to modify the texture coordinates (UVs).
In the shader system, coordinates range from 0.0 to 1.0. If x = 0.0, we are at the left edge. If x = 1.0, we are at the right edge.
By performing the operation 1.0 - x, we make the left side become the right side.
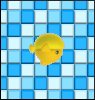
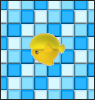
The final result should look like this:
If you only want to flip along the Y-axis, you need to modify the assignment of the texCoords variable:
texCoords.x = In.x;
texCoords.y = 1.0 - In.y;
If you want to flip the X and Y axes, you need to modify the assignment of the texCoords variable:
texCoords.x = 1.0 - In.x;
texCoords.y = 1.0 - In.y;
Created with the Personal Edition of HelpNDoc: Write EPub books for the iPad